

This forum is now read-only
To login to the new support channel and community forums, go to the Support Portal
Preparing boiler for shipping my L1 (9-14 weeks or more)
Two questions:
Should I open up my boiler and let it dry out before not using for 9-14 weeks, or longer? (edit: don't ask me how we will survive without it for so long.)
If yes, how do I open it?
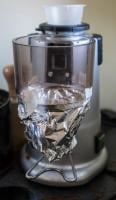
A third, related, issue is that there seems to be some corrosion around where the heater goes in. Does this look ok?

Should I open up my boiler and let it dry out before not using for 9-14 weeks, or longer? (edit: don't ask me how we will survive without it for so long.)
If yes, how do I open it?
A third, related, issue is that there seems to be some corrosion around where the heater goes in. Does this look ok?

Comments
i doubt you will ever get it completely dry, in which case it is always going to be susceptible to organic material growing in it
in this situation i place the machine on the stainless steel drain tray of the kitchen bench and undo the feed pipe from the boiler to the HX at the boiler end and let the boiler drain down. i then reconnect the pipe securely (tapping the fitting open and closed again with a hammer so you dont over-torque the fitting)
it is also advisable to place the red shipping tag back on the anti-vac valve to hold it up in the closed position so any residual water does not leak out if the box is inverted during shipping, but dont worry if you dont have it, just dont be alarmed if there is some water in the box at destination
the key step is to let the machine sit for at least an hour and preferably two at the other end when you start it up. once it is up to temperature perform long flushes through all three fittings (water, steam, group), oh, and dont forget to remove the tag off the anti-vac valve if you decide to fit it for shipping
rinse three times the volume of the boiler through the system, i.e. 2.3 litres x 3 = about 6 - 7 litres to ensure that is absolutely no risk of drinking contaminated water
and you're good to go
reiss.
this is slight weeping of moisture through the element gasket with the water being evaporated by the heat of the boiler and the minerals in the water being deposited there
no further action required
kind regards
reiss.
That sounds as if you were fastening it with the wrench, that is if the wrench was in an upright position. But maybe it was in from the bottom up and you tapped the end sticking out from under the machine. Can't visualise it correctly I think. Anyway, glad you got it sorted!
that's this one:
taking the pipe for the water valve off at the boiler end is also ok, but it isn't quite as low on the boiler so you may want to tip the boiler over a little
with all fittings on the boiler tap them off by using a hammer to strike the end of the wrench
DO NOT pull harder and harder on the wrench: you run the risk of twisting the boiler and then you will need to buy a new boiler
it might seem counter-intuitive but striking the end of the wrench with the hammer is the correct procedure; the shock frees the threads from each other
it is also the correct way to tighten the fittings when you re-fit them, although a little more care is required
for tightening the fittings i would proceed as follows;
1. tighten with wrench until it comes up snug - i.e. not pulling on the wrench for all you are worth, but just up snug/firm
2. make first hit with hammer on wrench: expect the nut to turn a lot
3. make second hit with hammer on wrench: the nut should move a lot less than the first time and you should feel it tightening up
4. make third hit with hammer on wrench: you should be able to feel the nut come up tight on the thread and stop moving
Do not make a fourth hit if you have felt the nut come up tight on the third hit or you are likely to break something